How to Make a TV Cover
Summary
Attach hooks or bootlace to a surface such as a canvas wall picture, decorative wall panel, picture frame, or foam board covered with fabric or gift wrap.
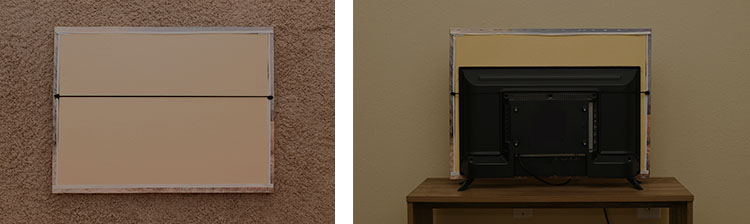
TV cover examples
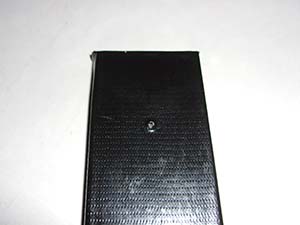
 Left: TV without a cover
Right: Picture frame with fabric in frame (stretched over a foam board).
 Left: Canvas wall picture
Right: Acrylic pour painted canvas covered frame
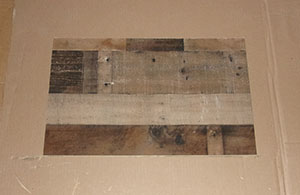
 Left: A piece cut from a decorative wall panel
Right: Decorative wall panel piece on cart leaning against TV
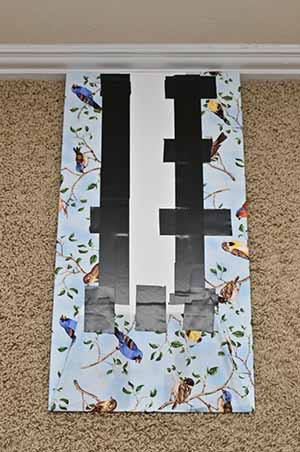
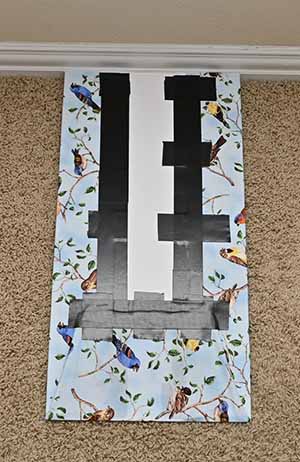
 Left: Picture frame with laminate sheet (the type of covering typically used on counter tops). Pictures cut from greeting cards are taped to it.
Right: Picture frame with artwork drawn on posterboard (possibilities include making your own or asking a child to make it)
 Left: Picture frame with fabric in frame (setting on the cart, rather than on the TV stand pieces)
Middle: Foam board covered with decorative posterboard
Right: Laminate sheet
 Left: Fabric covering
Middle: Fabric covering from side
Right: Laminate sheet covering from side
 Left: Self-adhesive shelf liner (with pictures cut from greeting cards taped to it)
Middle: Gift wrap over a foam board
Right: Artwork drawn on posterboard
Options for holding the TV cover to the TV
Hooks

Shoelace/bootlace (or something similar)
Wood pieces at top and sides

Place something in front of it – or just lean it against the TV

Surface material options
Most of these require a backing material that you will put this material over (or that you will put behind this material in a picture frame).
- Canvas wall picture
- *Decorative wall panel piece (backing material isn't needed for this)
- Fabric
- *Laminate sheet (On this website and on home improvement store websites, "laminate sheet" is used to refer to the type of covering that is typically used on counter tops. Formica is a common brand.)
- Gift wrap
- Poster
- Poster board: solid color, design (such as the wood design above), or with artwork made by you or someone else (perhaps a child)
- Bulletin board paper (such as used to cover large bulletin boards in school classrooms)
- *Bulletin board material (such as used to cover large bulletin boards in school classrooms) with a plastic surface on which you could use and easily remove tape
- *Self-adhesive shelf liner (also called contact paper)
- Wallpaper
- Wall mural (maybe one that is self adhesive and repositionable)
- Sheet vinyl flooring material
- Other artwork, photo, etc.
*Items marked with * above indicate surfaces on which you could use and easily remove tape (for attaching photos, greeting cards or images cut from them, family artwork, etc.).
Clear self-adhesive shelf liner or glass substitute material could be used over other coverings to make a surface on which you could tape photos, etc.
Backing material options
Options for what you put the surface material over (or what you put behind the surface material in a picture frame). (You could also leave this backing material as is without adding a surface covering if you find a color you like and/or you could make artwork directly on it.)
- Foam board (Used in the photos; at least 1/8" thick suggested; preferably 3/16" thick as used in the photos)
- Mat board (designed for picture frame backing)
- Illustration, drawing, or watercolor board
- Very heavy poster board
- Corrugated cardboard (such as from the box a TV comes in)
- Corrugated plastic sheet (these are often used for outdoor signs and are available in sizes up to 4' x 8'; in a home improvement store they might be with glass substitute materials)
Step by Step Instructions
Select type of TV cover
(Instructions will appear below the list of options.)
Canvas covered frame (either with a picture already on it or that someone will make a picture on)

Canvas covered frame (either with a picture already on it or that someone will make a picture on)
Wall panel cut to size

Wall panel cut to size
Picture frame

Picture frame
Foam board or other backing material covered with a surface covering (no frame)

Foam board or other backing material covered with a surface covering (no frame)
Wood pieces at sides and top

Wood pieces at sides and top
Show all supplies and all steps that apply to any option
Show all supplies and all steps that apply to any option
Instructions
Steps are numbered such that, for example, Step 11 for one option is the same step as Step 11 for another option. Different steps are needed for different options. Steps that don't apply to any options within your selection aren't shown.
Supplies that might be needed
Supplies that might be needed
A canvas covered frame that covers the front of the TV (either with a picture already on it or that someone will make a picture on)
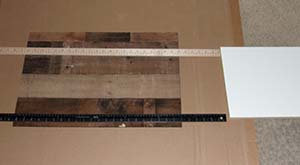
Wall panel cut to size. Many home improvement stores will cut it to size for you. You will likely need to pay for an entire wall panel (often 4 feet by 8 feet) so you might want to have several pieces cut to size so you can use the one that looks best to you. When considering what size/sizes to have the wall panel cut to, you might consider different options you might want to use such as using hooks, bootlace, or leaning it against the TV (as well as any other use you might have for a piece of wall panel). Make it high enough so that the top of the hooks don't show if using hooks. Make it wide enough to easily position the TV cover to cover the front of the TV. Precision isn't needed in determining either height or width. For the TV cover in the pictures, the wall panel was cut to about five cm more than the height of the TV and about five cm more than the width of the TV.
Art supplies if making your own art. Acrylic paint pouring can be used with neat results by people with no experience or expertise in art.
Pre-mixed pouring acrylic paint makes the process even easier. Instructions are widely available in print and online.
Acrylic paint pouring supplies:
Material to make the artwork on such as a canvas covered frame.
Nails (about 1.5 inches (about 4 cm) long) or push pins for puting one in each corner on the bottom of the material you are making the artwork on (such as a canvas covered frame) to elevate it while painting and drying. This helps for covering the edges with paint and for faster drying.
Acrylic pouring paint. A pre-mixed kit will make this easier. Check for hazardous contents. "Conforms to ASTM D-4236" means hazardous contents are listed (at least if at levels hazardous with expected use of the product). Shake well before use.
Cup/jar/can for paint pouring.
Disposable gloves are suggested.
Something to protect the surface such as a large piece of cardboard or platic.
If you do this outside, duct tape (or bricks, etc. for weight) to hold down what you are using to protect the surface so wind doesn't lift it.
Picture frame: You might be able to find a size that works for your TV. (The frame used in the pictures was purchased as a frame only without any backing or glass/glass substitute material.) If you can't find a size that works for your TV, a local store might make custom picture frames, or you could order a custom picture frame online. You could also make your own (not too heavy) picture frame from instuctions you find online or otherwise.
Surface material you will be using (such as laminate sheet, fabric, self-adhesive shelf liner, gift wrap, posterboard, etc.)
Laminate sheet (Formica is a common brand). This is the type of sheeting used on many countertops. You might be able to find some you like in a store that sells used construction materials. If not, you might need to order it online. A home improvement store's website might be the easiest way to find many varieties of this type of product.
Fabric: Preferably at least 25 cm more than the height and at least 25 cm more than the width of the TV.
Foam board or other backing material: Various options are available at craft stores, including foam boards but probably not corrugated plastic sheets. Foam boards are also available at office supply stores. Department stores might have small foam boards in craft supplies and/or office supplies. (If using foam board, at least 1/8" thick suggested; 3/16" thick used in the photos and is a common thickness for foam boards.) Corrugated plastic sheets are available at home improvement stores.
If using hooks to hold a canvas covered frame to the TV (and/or if you care what your canvas covered frame TV cover looks like from the back): Mat board (the type of material that is used for picture backing in a picture frame) or similar heavy and non corrugated cardboard such as illustration, drawing, or watercolor board.
Duct tape (preferably heavy duty)
For attaching fabric to the foam board (or other backing material). Packaging tape could be used instead, although heavy duty duct tape is suggested.
For attaching hooks or helping to attach hooks. For this heavy duty black duct tape is suggested.
To cover hooks made from bent corner braces, as a quick and easy substitute for painting, to cover screw holes, and to help avoid a scratch if a hook accidentally contacts the TV screen. (For TV covers that use a picture frame, also for covering other metal pieces to avoid scratches and as an easy substitute for painting.) For this black duct tape (preferably heavy duty for extra padding) is suggested.
For initially attaching shoelace, etc. to find location for screws or staple shaped nails for options that use a canvas covered frame or a picture frame, and to permanently attach shoelace, etc. for options that don't use a wood frame. For this, heavy duty duct tape is suggested.
If making TV cover with picture frame and holding it to the TV with hooks: To cover a narrow wood board as a quick and easy substitute for painting it (if you care what it looks like from the back). For this, black extra wide duct tape, such as 2.8 inches (71 mm) wide, is suggested.
If making a TV cover with wood sides, with a surface material covering for which the appearance could be affected by the color of the underlying material (many could be a little): To cover a side of the wood pieces used for edging to make it a similar color as the foam board (or other backing material), as a quick and easy substitute for paint. (This also has the advantage of smoothing out any places where things don't line up perfectly). For this you will need a color of duct tape similar to the color of the foam board (or other backing material) you will be using.
Double sided tape, preferably "permanent" or heavy duty for holding a yardstick, etc. to surface to cut along. (It can be easily removed from a yardstick using duct tape to grip it.)
Black permanent marker for coloring any little areas on the back of your TV cover that you want to be black. To color the screwdriver groves of a screw, you will need an ultra fine tipped marker, such as if using a screw to attach a shoestring to the back of a picture frame or canvas picture.
Cardboard or something else to protect the surface as you cut the foam board with a utility knife (unless you use scissors instead which works but creates a rougher cut). If using corrugated cardboard, two (or three) layers is suggested. Three layers is suggested if cutting wall panel.
If making a TV cover with wood sides, square wood pieces for the perimeter of the TV cover, such as 5/8 inch (as used in the photos), 11/16 inch, 3/4 inch, or other width that works and looks good to you.
One long enough for the top of the TV cover (the length of the top of the TV plus six inches). For a wall mounted TV or a TV with a large enough distance between the bottom of the TV and the TV stand to easily fit a piece of wood (unlike the TV stand in the photo), another piece the same length.
Two long enough for the side of the TV cover (the height of the TV plus four inches).
Selecting square wood pieces: Square wood pieces might be found in the molding section of a home improvement store (in the area with wood trim pieces that are often installed at the bottom of a wall). Short pieces are referred to as square wood dowls. 5/8 inch square wood dowls were used for the TV covers in the photos. You might consider using wood pieces that are wide enough such that you can simply put small eye screws into the wood pieces to function as hook ends for securing the TV cover to the TV. When selecting wood pieces try to select ones with minimal warping. You can test for warping by placing the wood piece on a floor, wall, etc.
Regular household clear drying multi-purpose white glue
To glue wood pieces to the foam board (or other backing material).
If using fabric with a TV cover with wood sides, to rub through the fabric covering to attach the fabric to the wood pieces.
Optionally, for additional hold (along with duct tape) for attaching hooks.
Woodworking corner braces: two (four if for a wall mounted TV or a TV with a large enough distance between the bottom of the TV (including any descending piece) and the TV stand pieces to easily fit a piece of wood). 1-1/2 inch corner braces were used for the TV cover in the photo. Use corner braces that aren’t wider than the width of the wood pieces you are using. If available, you might want to use braces with a black finish (although wrapping them with black duct tape is an option and you might want to do that anyway to avoid risk of scratching).
If making a TV cover with wood side pieces: Screws for attaching woodworking corner braces. Use flat head screws that won’t go through the opposite side of the wood piece. You might need to use screws other than ones that might have come with the braces. (If you use 5/8 inch wood pieces, you might want to use #6 x 5/8 inch flat head wood screws.) Alternately, if the screws you are using are a little too long, insert cereal box cardboard, etc. between the brace and the wood piece to prevent the screws from going through the other side of the wood piece.
Four bricks to use as weights or something else to use as weights.
Optional – and can be installed later (for TV covers with wood sides): Angle aluminum
the length of the TV cover (minus the width of two wood pieces)
1/16” thickness, 1/2" wide used for the TV cover in the photo
This is an optional piece you can install after you are finished if you notice bowing at the bottom of your TV cover and want to eliminate the bowing.
If using shoelace/bootlace (or something similar) to hold the TV cover to the TV:
A shoelace, bootlace, or something similar. A round black shoelace or bootlace is suggested.
Something to hold the shoelace to the frame. (Perhaps black if available or you could color them black with a permanent marker.)
Options include:
Staple nails / cable staples / wire staples (staples you pound in with a hammer). Don't pound them in all the way so you can adjust the tightness of the shoelace.
Eyescrews
Two round head screws (about 1/2 inch long). To be sure the shoelace, etc. doesn't slip off the screw (or if using a flat shoelace instead of a round shoelace/bootlace) a small fender washer (a washer with a small hole in the center for a screw) could be used with the screw.
Attachment that comes with a gate hook set (staple to hammer in or attachment to screw in)
Picture hanging hardware that might have come with the frame. (If you use this, you might want to rotate it 90 degrees.)
Duct tape is an option if the TV cover is light and will be resting on a flat surface.
If using hooks to hold the TV cover to the TV:
Hooks (or something to use to make hooks) for hooking the TV cover over the top of the TV
Best options:
Two 1-1/2 inch woodworking corner braces (preferably black) to bend into hooks. This is suggested if using the hooks on a wood canvas covered frame or a wood picture frame. This also works well for other options that use hooks. So the hooks will hold the top of the TV cover flat against the TV, use woodworking corner braces that don't have a "dent" in the corner (the "dent", for stability, is typically in braces that are over 1-1/2 inch). 1-1/2 inch woodworking corner braces is a size that works very well for most TVs. There are instructions for bending the braces into hooks in the instructions.
Household hooks that would position the TV cover flat against the TV. The majority of household hooks wouldn't position the TV cover flat against the TV. Select hooks with the hook coming from a flat, non-raised, surface.
Would also work:
Wire to fold so it is two thick and bend into a hook shape
Coat hooks that would allow the TV cover to be positioned flat against the TV. The hook would need to be straight, rather than curved, so not a typical coat hook, and the TV cover would need to be pushed flat against the TV, rather than automatically positioning flat against the TV.
Two woodworking corner braces taped together into a "[" type shape
(Hooks can be attached to a foam board, etc. using heavy duty duct tape.)
1/4" thick wood boards to attach hooks to (such as 1/4" thick x 1.5 inch wide x 3 feet long wood boards), if using hooks. You will need two boards, each the height of the inside of the picture frame you are using. Poplar is a common type of wood for this size of board. They are sometimes called hobby boards (although available at home improvement stores, rather than hobby/craft stores).
If using hooks with screw holes, such as made by bending woodworking corner braces (as suggested): 1/4" flat head screws. These are unusually short and a department store probably won't have them. These can be found in home improvement / hardware stores. While not necessary because glue, duct tape, and a thumb tack can be used instead, these screws are suggested.
Six woodworking mending plates, 2" long for holding the boards with the hooks to the picture frame.
Screws for woodworking mending plates
Tools that might be needed depending on how you are making the TV cover
Something to cut the foam board such as a utility knife, heavy duty craft knife, pocket knife, kitchen knife (even a butter knife works, but a sharper knife works better), or scissors. If you use a scissors, before you cut where you want the cut, it might work best to initially cut about a cm away from where you want the cut. (Using a table saw would be another option.)
Wood saw (unless you determine the exact length needed and cut your wood pieces at the store or have them cut at the store)
Hack saw for metal if you install an optional metal piece on TV covers with wood sides
Pliers for bending woodworking corner braces into hooks to hook the TV cover over the TV
Screwdriver
If making a TV cover with wood pieces at the edges: For screws for the woodworking corner braces.
If using a bootlace, shoelace, etc. to hold the TV cover to the TV: For screws to attach the bootlace, etc. to.
If making a TV cover that uses a canvas covered frame held to the TV with hooks made from bent woodworking corner braces: For a screw to attach a hook.
If making a TV cover that uses a picture frame held to the TV with hooks made from bent woodworking corner braces: For screws to attach the hooks and mending plates.
Optional: Drill with small drill bit (such as 7/64 inch) for screws for two of the mending plates to avoid a slight short split in the wood on the back of the picture frame.
Collapse: Supplies that might be needed
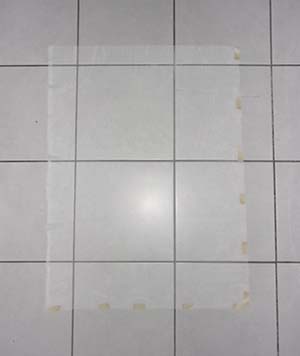
Step 1: If using laminate sheet or fabric for the surface, get it ready to use
Step 1: If using laminate sheet or fabric for the surface, get it ready to use
Laminate sheet
Laminate sheet instructions below
Fabric
Fabric instructions below
If you buy it new, laminate sheet comes rolled in a box

Reverse roll the laminate sheet and hold with duct tape. Have one strip of duct tape nearby ready to apply to hold the roll. Then apply a strip of duct tape near each end.

Duct tape near the end of the laminate sheet

After you complete steps two through nine and are ready to cut the laminate, unroll the laminate sheet and remove duct tape

Collapse Step 1
Scroll to top of Step 1
Get creases out of fabric
Hang fabric and soak it (or at least soak creased/wrinkled areas) with water using a spray bottle, sponge, or wet cloth. Let dry. (Or use another method that works for you with the fabric you’re using.) You will be able to stretch the fabric a little over the foam board to further reduce any wrinkles/creases.
The fabric could be hung over a shower curtain rod or over the rail above shower doors. If hanging over the rail above shower doors, roll a towel lengthwise and place it on top of the rail to avoid creases from the edges of the rail. You might want to place trash bags over the towel so the fabric dries faster and to help for better wrinkle removal. If results are unsatisfactory rotate the fabric 90 degrees so it is hanging the other way and repeat, and/or iron. It is possible there could be a slightly faded line where the crease was when the fabric was stored folded on the fabric bolt, probably not noticed from a distance. To completely avoid that, an option for a smaller TV size is to have the crease/fade line wrap around to the back of the TV cover. Other options include different fabric and using fabric that hasn’t been stored folded (fabric from a roll of fabric rather than from a shorter bolt of fabric with the fabric folded on the bolt).

Collapse Step 1
Scroll to top of Step 1
Step 2: Determine and mark height (vertical dimension) and width (horizontal dimension) of foam board (or other backing material)
Step 2: Determine and mark height (vertical dimension) and width (horizontal dimension) of foam board (or other backing material)
Picture frame
Picture frame instuctions below
No picture frame or wood sides
No picture frame or wood sides instuctions below
Wood pieces at sides and top
Wood pieces at sides and top instructions below
You can skip this step and step 3 if foam board or other backing material came with the picture frame; however, perhaps depending on your picture frame, it might be the most convenient to use foam board for thickness to easily keep what you are using in front of the foam board tight against the picture frame. Wood pieces you attach in Step 12 will hold the foam board (and whatever you have in front of it) against the picture frame. Depending on your picture frame, if you wrap a foam board with fabric, and want to be able to switch it with counter top type laminate, you might want to cut an addtional foam board you don't wrap with fabric for using with the laminate sheet because the fabric wrapped foam board behind the counter top type laminate sheet might be a bit too thick to work well with the wood pieces you attach in Step 12.
Mark near the edge of the foam board. Then mark the same distance near the opposite edge of the foam board. Then mark the other dimension. (When marking the opposite edge for the dimension you will be cutting second, mark where you won't be cutting your mark off when you make the first cut.)

Collapse Step 2
Scroll to top of Step 2
You can skip this step and step 3 if you want to use the foam board with its uncut size.
Make it high enough so that the top of the hooks don't show if using hooks. Make it wide enough to easily position the TV cover to cover the front of the TV. Precision isn't needed in determining either height or width. For the TV cover in the pictures, the foam board was cut to about five cm more than the height of the TV and about five cm more than the width of the TV. Mark each end of the board for height and for width. (When marking the opposite edge for the dimension you will be cutting second, mark where you won't be cutting your mark off when you make the first cut.)
Collapse Step 2
Scroll to top of Step 2
Mark the height at which to cut the foam board
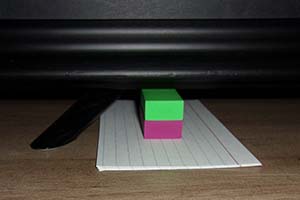
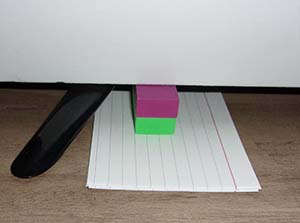
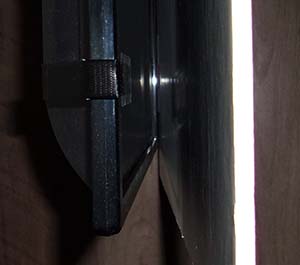
For the type of TV stand in the photos, some precision is needed for the height of the TV cover (the height of the foam board) and the following method to directly mark the distances is suggested:
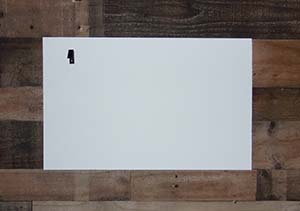
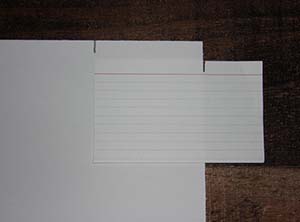
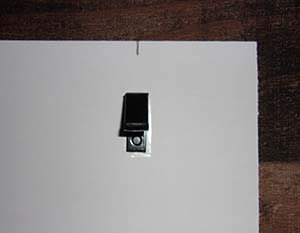
Make the set-up in the photos below. The wood pieces in the photos are pieces cut from the wood to be used for the wood frame. The padding between the top wood piece and the TV is a piece cut from the padding to be used. The index cards were used to raise the bottom wood piece to the bottom of the descending piece of the TV. A stack of paper, sticky notes, etc. could be used instead.

 Mark height on a yardstick (or piece of wood such as a wood piece you will be using for the sides) and then on the foam board, etc.
Place the end of a yardstick (or piece of wood, etc.) on top of the bottom wood piece (in the setup shown above) and tape a piece of masking tape on the yardstick so that the masking tape goes from a little below the top of the top wood piece to a few cm above the top wood piece.

With the yardstick against the front of the TV screen (at both the top and bottom of the TV screen) mark the masking tape at the top of the top wood piece ("Mark 1").

Move the top wood piece to directly above the TV stand piece. With the end of the yardstick on the TV stand piece and with the yardstick against the front of the TV screen (at both the top and bottom of the TV screen) mark the masking tape at the top of the top wood piece ("Mark 2").


Remove the yardstick and make another mark ("Mark 3") 1/8 inch from Mark 1 in the direction of Mark 2.

Now make another mark ("Mark 4", the red mark in the picture below) half way between "Mark 3" and "Mark 2" (a very small distance with the type of TV stand in the photos). This is the distance at which to cut the foam board.

Mark the distance (at "Mark 4", the red mark in the picture above) at both sides of the foam board.
Width of foam board:
The width of the TV +
the width of two wood pieces +
2 cm for screws, etc. for later attaching an optional angle aluminum piece at the bottom of the TV cover +
enough additional width to make it easy and quick to put the TV cover on (up to 8 cm suggested; not less than 1 cm; 2 cm used for the TV cover in the photo covering a small TV)
Mark the width of the foam board. (Mark it at both ends of the part of the foam board that will be left after you make the first cut to cut the foam board to the correct height.)
Collapse Step 2
Scroll to top of Step 2
Step 3: Cut the foam board (or other backing material) or wall panel piece
Step 3: Cut the foam board (or other backing material) or wall panel piece
Foam board or similar backing material
Foam board or similar backing material instructions below
Wall panel
Wall panel instructions below
Put down cardboard (sufficiently thick/layered) to protect surface and place the foam board on the cardboard. If using corrugated cardboard, two (or three) layers is suggested.
In these instructions, using the board (a shelf in the pictures) is optional, but can make acurately positioning the yardstick when it has double sided tape attached to it easier.
Put a yardstick (or something similar of minimal thickness to allow the blade of a utility knife to move against it without holding the utility knife at an angle) on the foam board. A metal yardstick is suggested, but an unwarped wood yardstick will work well also. Angle aluminum will also work very well (and for TV covers wider than a yard, with a long piece of angle aluminum you can make one cut without repositioning a yardstick). Put a board (or something similar) next to the yardstick. A shelf is used in the picture below. With the yardstick and board up against each other, position the yardstick along where you want the cut and with the yardstick over the part of the foam board that you will be cutting off.

Flip the yardstick over and put double sided tape on the yardstick near the ends of the foam board and at about every 10 cm between. Rolled tape could be used instead (with the rolled tape placed in the direction such that the yardstick won't roll away a little as you cut along the yardstick).


Put the yardstick back down along the board/shelf with the double sided tape contacting the foam board. Then remove the board/shelf and press the yardstick down on the foam board to better attach it to the foam board.

Cut the foam board along the edge of the yardstick using a utility/box knife (preferably with a new/sharp blade). Alternately use a sharp pocket knife or a sharp kitchen knife.
Remove the yardstick (attached to the part of the foam board you cut off). If the double sided tape remains on the yardstick (instead of on the foam board you removed), easily remove it from the yardstick by placing duct tape over the double sided tape and remove the duct tape along with the double sided tape. While you don't necessarily need to do this right away, if you wait a day or so before removing the double sided tape it could lighten markings on the yardstick when you remove the double sided tape.
Cut the foam board for height using the same method.
Scissors could be used instead. If using a scissors on foam board, before you cut where you want the cut, it might work best to initially cut about a cm away from where you want the cut.
(Using a table saw would be another option if you have access to one.)
Collapse Step 3
Scroll to top of Step 3
Instructions for cutting a wall panel piece (if you need to cut it to size, remove a damaged edge, etc.)
Note: Many home improvement stores will cut it to size for you. See the supplies section for more information.
If you have access to a power tool to cut the wall panel, using that might be easier. These instructions work well for if you don't have access to a power tool to cut the wall panel.
Put down cardboard (sufficiently thick/layered) to protect surface and place the wall panel on the cardboard. If using corrugated cardboard, three layers is suggested.
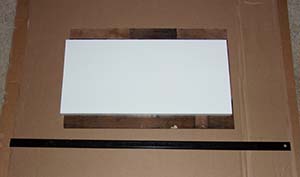
Put a yardstick (or something similar of minimal thickness to allow the blade of a utility knife to move against it without holding the utility knife at an angle) on the wall panel with the finished side of the wall panel facing up. A metal yardstick is suggested, but an unwarped wood yardstick will work well also. Angle aluminum will also work very well (and for TV covers wider than a yard, with a long piece of angle aluminum you can make one cut without repositioning a yardstick). Put a board (or something similar) next to the yardstick. A shelf is used in the picture below. With the yardstick and board up against each other, position the yardstick along where you want the cut and with the yardstick over the part of the wall panel that will become part of your TV cover (as the cut tends to be better for the part under the yardstick and if your blade slips it doesn't cut what will become part of the TV cover).
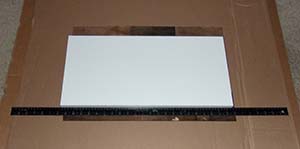
White shelf, black yardstick, wall panel showing a little above and a little below the white shelf, layers of brown cardboard
Flip the yardstick over and put a long piece of double sided tape on the yardstick so the taped part of the yardstick spans at least the entire length of the cut you will be making.
Put the yardstick back down along the board/shelf with the double sided tape contacting the wall panel.
Move the board/shelf aside and press the yardstick down on the wall panel to better attach it to the wall panel.
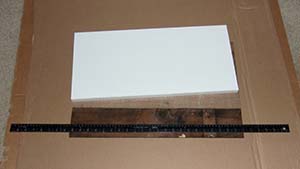
Position something of the same or slightly greater thickness as the yardstick (a second yardstick in the pictures below) a distance from the yardstick such that when you place the edge of the board/shelf near the center of the yardstick, the second yardstick (or whatever else you are using) is under the opposite side of the board/shelf near the edge.
Place another long piece of double side tape on top of the yardstick (the black yarstick in the picture below) so the taped part of the yardstick spans at least the entire lenght of the cut you will be making. (This helps keep the board/shelf from slipping when you make the cut.) Then place the board/shelf on the yardsticks such that one edge of the board/shelf covers about half of the yarstick that you will be making the cut along. This is so you can keep downward pressure on the yardstick to keep it from slipping (when combined with the double sided tape you place earlier) as you make the cut.
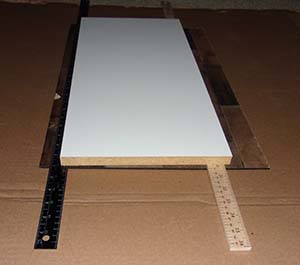
While pressing on the board/shelf, cut the wall panel along the edge of the yardstick using a utility/box knife (preferably with a new/sharp blade). This could take about 25 firm scores (partial cuts) to cut through the wall panel.
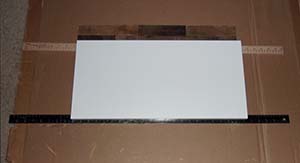
Remove the yardsicks and board/shelf.
Remove the double sided tape from the yardstick using a short piece of duct tape attached to one end of the double sided tape to pull up an end of the double sided tape to get it started to easily remove it. While you don't necessarily need to do this right away, if you wait a day or so before removing the double sided tape it could lighten markings on the yardstick when you remove the double sided tape.
Collapse Step 3
Scroll to top of Step 3
Steps 4 through 8 are only for if you are using wood pieces on the sides and top
Step 4: Mark and cut square wood pieces for the edges of the TV cover
Step 4: Mark and cut square wood pieces for the edges of the TV cover
Mark and cut square wood pieces for the right and left sides of the TV cover
Place wood piece on work surface (floor, table) and place a short end of the foam board on the wood piece with one end of the foam board flush (even) with an end of the wood piece. Mark the other end of the wood piece at the end of the foam board. Do this for the two side wood pieces.


Cut the wood pieces considering that just a little shorter than the height of the foam board is better than just a little longer than the height of the foam board.
 Mark and cut square wood piece for the top of the TV cover
Temporarily tape a side wood piece in position on the foam board. Place end of top wood piece up against it. Place side wood piece and 10 index cards (note cards) flush (even) with the edge of the foam board and mark the top wood piece. (Instead of adding ten index cards, for marking the top wood piece you could position the side wood piece about 2 mm in from the side.) Cut top wood piece at the mark.


Collapse Step 4
Scroll to top of Step 4
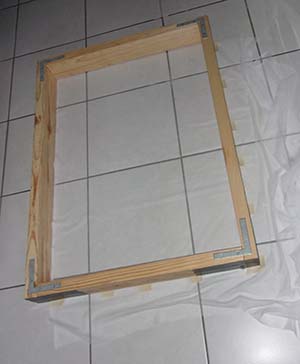
Step 5: Attach the wood pieces using glue
Step 5: Attach the wood pieces using glue
You might want to make the side of the foam board that you didn’t cut the top of the TV cover. For the sides, you might want to put any ends of the wood pieces that you didn’t cut at the top.
Place the foam board on a flat non-carpeted surface. (You might want to place paper, such as gift wrap, under the edges of the foam board in case glue squeezes out when you glue on the wood pieces.) Place a weight near each corner of the foam board to ensure that it is flat when you attach the wood pieces and to have the weights handy for weighting down the wood pieces when gluing them to the foam board.


Use white household multi-purpose glue to attach the two side pieces. Then glue the top wood piece in place with about an equal gap on each side of the top wood piece (between the top wood piece and the side wood pieces, about a half mm to a few mm is fine, just so it isn't tight against the side wood piece on either side; cut or sand a little off if needed). For wall mounted TVs and TVs with plenty of space between the bottom of the TV and the TV stand, attach a bottom wood piece; otherwise, for TVs that don’t have much space between the bottom of the TV and the TV stand (which is common) don’t attach a bottom wood piece.

In the picture below, left over square wood pieces are used to stabalize the bricks that are used to add weight to the glued wood pieces.

Wait at least an hour after gluing. Remove bricks.

Collapse Step 5
Scroll to top of Step 5
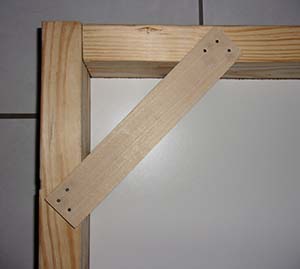
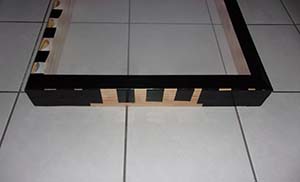
Step 6: Attach woodworking corner braces
Step 6: Attach woodworking corner braces
Selecting braces and screws: 1-1/2 inch corner braces were used for the TV cover in the photo. Use corner braces that aren’t wider than the width of the wood pieces you are using. Use screws that won’t go through the opposite side of the wood piece. You might need to use screws other than ones that might have come with the braces. (If you use 5/8 inch wood pieces, you might want to use #6 x 5/8 inch flat head wood screws.) Alternately, if the screws you are using are a little too long, insert cereal box cardboard, etc. between the brace and the wood piece to prevent the screws from going through the other side of the wood piece.
Attach the braces while your TV cover is on a hard flat surface such as a non-carpeted floor or a table top.
If the screwdriver starts slipping out of the screw head and damages the screw head, remove the screw and use a new screw. (If the corner brace has two screw holes consider using the other hole.) You might want to loosen and retighten the screws later to make adjustments to reduce warping.
For something to press against when putting in the screws, leftover wood pieces were used. Small pieces cut from a felt pad were applied to lift the wood pieces above the caulk where the wall meets the floor.


Index cards (note cards) were used to raise the braces to just a bit below the top of the wood piece; this helps with stability and for more effectively making adjustments if needed later to reduce warping.

Ten small pieces cut from index cards (note cards) were used between the brace and the top wood piece. This makes it so it can be adjusted later if needed to reduce warping.

Paper binding clips were used to hold the brace in place and bricks were used as weights to keep the TV cover level while putting the screw in. An extra square wood piece was used to make it so the brick weights could be positioned away from the work area.
Ready to put in side screw.


Ready to put in the top screw.

 Steps 7 and 8 could alternately be completed after attaching the covering (Step 15), which for a fabric covering might make some things just slightly easier. For other coverings, completing steps 8 and 9 after step 7 is suggested.
Collapse Step 6
Scroll to top of Step 6
Step 7: Attach felt blanket strips
Step 7: Attach felt blanket strips
Steps 7 and 8 could alternately be completed after attaching the covering (Step 15), which for a fabric covering might make some things just slightly easier. For other coverings, completing steps 8 and 9 after step 7 is suggested.
Felt blanket

Ten index cards (note cards) under felt blanket so felt blanket strip will be a little narrower than the wood piece

Mark the back of the felt blanket


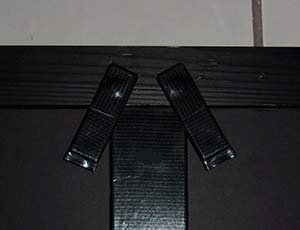
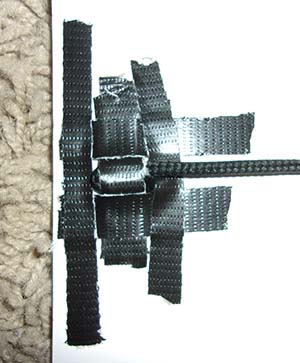
For best results for keeping the entire TV cover flat against the TV, apply five narrow strips of duct tape near the outside edge of the top wood piece so when the felt strips are attached they will angle back.


Cut felt blanket strips and apply to TV cover


Collapse Step 7
Scroll to top of Step 7
Step 8: Make adjustments so the entire TV cover fits flat against the TV
Step 8: Make adjustments so the entire TV cover fits flat against the TV
Test the TV cover on the TV to see if the entire TV cover fits flat against the TV. Make sure the top of the TV cover is flat against the top of the TV. See if on one side of the TV cover, there is a gap at the bottom between the TV cover and the TV (at least more of a gap then there is on the other side). If so, on the side that has the gap, remove the corner brace screw in the top wood piece and remove one notecard piece for every two mm of gap for small TV covers and one notecard piece for every three mm of gap for large TV covers. Put the screw back in and test. Change the adjustment as needed. If there is a substantial gap near the bottom on both sides it could be because the foam board is bowing in at the bottom towards the TV and you might need to install an aluminum piece as in Step 18 to eliminate the bowing.
Collapse Step 8
Scroll to top of Step 8
Step 9: If painting canvas covered frame, paint canvas (acrylic paint pouring can be used with neat results by people with no experience or expertise in art).
If using a piece cut from a wall panel, unwarp the wall panel piece if needed.
Step 9: If painting canvas covered frame, paint canvas (acrylic paint pouring can be used with neat results by people with no experience or expertise in art). If using a piece cut from a wall panel, unwarp the wall panel piece if needed.
Acrylic pour painting and how to make a bug screen for letting artwork dry outside
Acrylic pour painting and how to make a bug screen for letting artwork dry outside – instructions below
How to unwarp wall panel piece
How to unwarp wall panel piece – instructions below
Acrylic paint pouring can be used with neat results by people with no experience or expertise in art. Pre-mixed pouring acrylic paint makes the process even easier. Instructions are widely available in print and online.
Put a nail (about 1.5 inches (about 4 cm) long) in each corner on the bottom of the material you are making the artwork on (such as a canvas covered frame) to elevate it while painting and drying. This helps for covering the edges with paint and for faster drying. (Alternately, you could use push pins or screws.) Although not necessary, if you want the artwork to not wobble at all when drying, after you put in the first nail (or whatever you use) you could fold a small piece of paper to be the same distance as it is from the wood to the head of the nail and use the paper to put the other nails in so it is the same distance from the wood to the head of the nail.
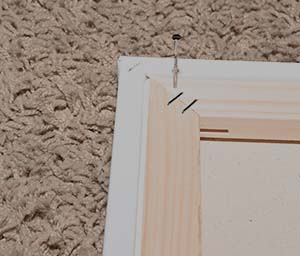
If painting and letting it dry outside, painting and drying in a screened in area or making a screen cover is suggested (see instructions at the bottom of the instructions for this step). If a bug lands on artwork made with acrylic paint pouring, it doesn't work well to just touch it up with a brush. Also, make sure the area is free of dirt so wind doesn't get dirt on it. A tweezers can be used if necessary.
Put down something to protect the surface such as a large piece of cardboard or platic. If you do this outside, duct tape down (or weight down) what you are using to protect the surface so wind doesn't lift it.

Paint the canvas. Using disposable gloves or dishwashing type gloves, etc. is suggested. For the example, the flip cup pour painting method was used. A fully filled 18 oz jelly jar was used and provided about the right amount of paint for a 18" x 24" (46 cm x 61 cm) canvas. Shake the paint well before using. Marks were made on masking tape to indicate to where to fill each paint color.

Brown and white colors were used, starting with a layer of white paint. Pouring the paint directly onto a spoon near the surface of the paint in the jar reduces mixing.

The canvas covered frame was put over the top of the paint filled jelly jar.

The jar and canvas flipped over.

The jar was lifted quickly off the canvas and the canvas was tilted to spread the paint over the entire surface of the canvas including the edges. If there is an area, such as on an edge, that you can't get covered this way, use some paint left in the cup/jar and/or some run off paint to cover it.

A home made bug screen over the artwork. (See below for how to make one.)

Put tape around the bottom edge to be sure bugs don't get in from under the bug screen.

Letting it dry for at least two days is suggested. Then evaluate if you need to position it differently for drying / let it dry longer to be sure to avoid getting paint on your TV and/or tape posterboard over anything that has paint on it that might be contacting the TV.
How to make a bug screen for letting artwork dry outside
Use two wood pieces at least about six inches (about 15 cm) longer than the length of your artwork and two wood pieces at least about six inches (about 15 cm) longer than the width. In the pictures, two "2X4" (1.5 inch x 3.5 inch x 2 feet) wood boards and two "2X4" (1.5 inch x 3.5 inch x 3 feet) wood boards were used.
Duct tape the boards together into a rectangle.
Attach a flat corner brace to each corner. Optionally, you could use something to make sure the boards are at about 90 degree angles. A shelf was used in the picture below. Another option is to use a foam board.


Alternately, instead of using a flat corner brace you could nail a thin piece of wood (about yardstick thickness) across each corner - or attach a metal mending brace across each corner.
Another option, instead of using a flat corner brace, is to use only duct tape. The result will be wobbly and might not last long, but if you don't plan to use it for more than a week or so it would probably work fine. Attaching the fabric later will add some stability.


Flip it over and do the same on the other side. (This only applies to this duct tape only option.)
If you need to keep pets off your artwork and you think a screen only might not keep them off, something such as chicken wire fencing could be used before attaching a screen. Otherwise, you only need to attach a screen as in the directions below.
Using ultra light fabric for a screen works well. Place the fabric on the floor and place the frame over it such that a corner of the fabric meets an inside corner of the frame. Then place pieces of tape along the outside of the opposite sides of the frame. 3/4" masking tape was used for the picture below.
Cut the fabric along the outside of the tape (if using tape about 3/4" wide).
Tape the fabric to the frame at the corners. It might appear very loose like it might sag in the middle, but it will tighten a lot as you attach the edges to the frame. (In the pictures below, fabric cut along the inside of the tape, rather than the outside of the tape was used. It was initially cut on the outside of the tape, but after taping the corners and the center of each of the four sides to the frame it appeared the fabric would be too loose and might sag in the middle so another 3/4" was removed. Later found that the fabric continues to tighten a lot as more of the edge is taped to the frame.)
Tape the edges to the frame. While it might not be necessary, to provide extra hold use the method below. Place a short piece of tape on the bottom side of the fabric. On the top side of the fabric, place a longer piece of tape on top of the short piece of tape. The pull the fabric to the edge of the frame and tape it down.


After taping the fabric to the edge of the frame, put a piece of duct tape along the top of each edge.
Place another piece of duct tape so that about half of it is over the top and about half of it is over the side of the frame.


Collapse Step 9
Scroll to top of Step 9
Note: See the supplies section for notes about determining what size to make the wall panel piece.
How to unwarp wall panel piece
(This can also be done after you finish making the TV cover.)
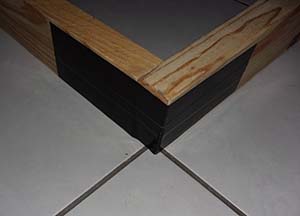
As shown below, place the panel piece over wood boards, etc. (1.5 inch wood boards used in the image below) and place something to use for weight (travel cooler filled with bottles or jugs of water, case of water bottles, tool box, bricks, books, etc.) near the center to temporarily hold it opposite of the warp (about ten hours might be about right).

Collapse Step 9
Scroll to top of Step 9
Step 10: If using hooks on a canvas covered frame (either with a picture already on it or that someone will make a picture on), attach mat board (or other sturdy, but not too heavy, option) to back of canvas covered frame. If using shoelace/bootlace optionally complete this step if you want it to look better from the back.
Step 10: If using hooks on a canvas covered frame (either with a picture already on it or that someone will make a picture on), attach mat board (or other sturdy, but not too heavy, option) to back of canvas covered frame. If using shoelace/bootlace optionally complete this step if you want it to look better from the back.
If there is any picture hanging hardware on the canvas covered frame, first remove the picture hanging hardware.
Cut the mat board to fit just inside the edge pieces of the frame.
If you will be using hooks to hold the TV cover to the TV, measure the distance from a side edge of the canvas covered frame to the center of the center vertical brace (or mark this distance on a board, etc.).
Attach the mat board using an upholstery stapler, household stapler opened so it can staple into a surface, small staple shaped nails, or glue. Attach with one staple in the top right brace at the far right and one staple in the top left brace at the far left (and/or whatever is needed). If using hooks, you will be screwing in a center hook on the center brace to hold the weight (if you use a hook with a screw hole such as made by bending a woodworking corner brace into a hook, which is suggested for this option). A hook near each end, taped to the mat baord, will be added for stability. If using a shoelace, etc. to hold the TV cover to the TV, you only need a mat board if you care what it looks like from the back.


Collapse Step 10
Scroll to top of Step 10
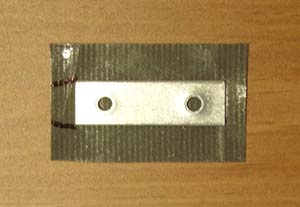
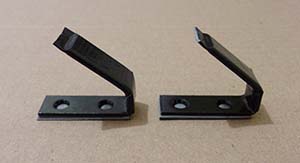
Step 11: If using hooks to hook the TV cover over the top of the TV, and if making hooks from woodworking corner braces (suggested if using hooks), bend woodworking corner braces into hooks (and cover them with black duct tape)
Step 11: Bend woodworking corner braces into hooks (and cover them with black duct tape)
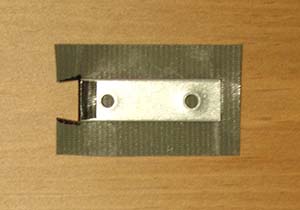
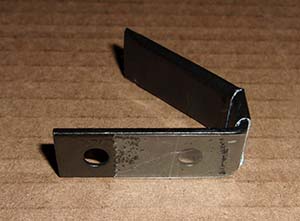
Grip one end of the brace with pliers at the hole closest to the corner of the brace, gripping over the rest of that end of the brace. (Notice exactly where you are gripping it, so you can grip the other corner brace in the same place when making the second hook.)
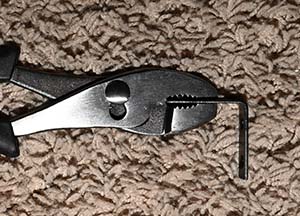
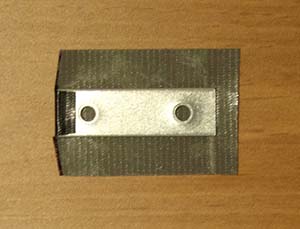
With the non-gripped part of the brace flat on carpet (or a washcloth, etc.) bend the gripped end into a hook.

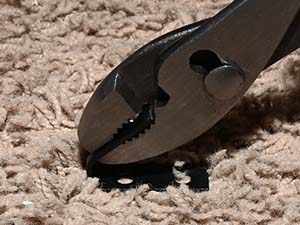
Repeat for the second brace, matching it up to the first hook so you make the second hook to match the first hook.
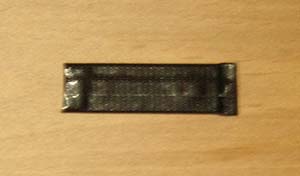
For appearance (to cover holes and to make the hooks black if they aren't already) and for padding to avoid scratches, cover the bent half of the hooks you made with duct tape. Using the method below will create a flat surface on the bottom side of the hook where it contacts the TV; this makes it easier to correctly position the hooks using the instructions for that.
Put duct tape on the outside of the bent half of the hook.

Put another hook (or an unbent corner brace) next to it.

Make a line along the outside of the hook you added and remove the hook you added.

Do the same on the other side.

Cut along the outside of the lines.

Cut slits in the duct tape where the hook starts to bend down (indicated by lines in the picture below).
Wrap the duct tape over the hook, starting with the small section near the corner. At the end of the hook leave about 5 mm of tape extending past the end of the metal and cut off the rest.

Collapse Step 11
Scroll to top of Step 11
Step 12: If using hooks to hook the TV cover over the top of the TV, attach hooks
Step 12: If using hooks to hook the TV cover over the top of the TV, attach hooks
Canvas covered frame
Canvas covered frame instructions below
Picture frame
Picture frame instructions below
No frame (such as frameless foam board or wall panel piece)
No frame (such as frameless foam board or wall panel piece) instructions below
If your canvas covered frame has one vertical brace in the center, use three hooks, one in the center screwed into the vertical brace to hold the weight and two more near each end for stability.
Use items of identical height (big erasures, pieces of wood, packs of index/note cards, etc.) along with some type of cards (index/note cards, playing cards, cards from a game, etc.) to set the TV cover on for determining where to position the hooks. Add/remove cards (with the same number of cards on both sides) till the TV cover is positioned as you would like, making sure the bottom of the TV cover covers any descending piece on the front of the TV. (If needed, it will be possible later to raise the TV cover a little on one or both sides by putting layers of duct tape under the hook where the hook contacts the TV.) Make a short horizontal pencil mark on the back of the canvas covered frame at or a bit above the top of the TV at about the location of the center brace.


Remove the canvas covered frame, leaving the supports in place.

A little above the horizontal line you made, make a vertical mark over the center vertical brace. Do this by measuring over from the side of the canvas covered frame (especially convenient if you measured this distance before you attached the mat board, but you could also detect where the brace is at the top) or by using pressure to identify where the center brace is.

Place household double sided tape (or rolled tape) on the base of the hooks.
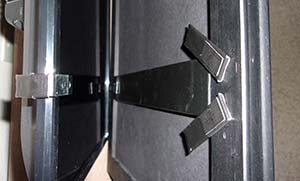
Place the hooks over the top of the TV with the center hook at the center of the TV and the side hooks equal distances from the ends.

With the bottom edge of the canvas covered frame on the supports and the canvas covered frame located on the supports such that the center hook will contact the back of the canvas covered frame below the center line, move the canvas covered frame to the hooks to attach the hooks to the back of the canvas covered frame to set the location of the hooks.

Put a screw in the bottom hole of the center hook to firmly attach the center hook to the frame.

Put screws in the bottom hole of the side hooks. (You will likely be screwing into mat board only. The screw, in combination with duct tape you will use, will help keep the hook from sliding up.) It might make it easier if you first poke a hole with a thumb tack.

Put heavy duty duct tape over the base of the hooks to help hold the hooks on and to protect the TV from scratches.

You could make small adjustments (in the direction of raising one or all sides of the TV cover) by apply layers of duct tape to the bottom of the hook(s).
Notes if you aren't using screws: If you aren't using a screw for the center hook, put a staple in the vertical brace directly above and directly below the center hook. If your hooks have screw holes, but you aren't using screws to help attach them, before you use duct tape to attach the hooks, put a dab of glue in the screw holes to help keep the hooks from sliding up and/or put a dab of glue where the top of each hook contacts the surface. If instead of using screws you are using glue on the back of the hooks, if the glue you are using doesn't work well for the material your hook is, you might want to first wrap duct tape around the base of the hook if the glue would adhere better to duct tape than to the hook material.
Collapse Step 12
Scroll to top of Step 12
Cut two 1/4" thick wood boards to place vertically on the inside back of the picture frame on which to attach the hooks. Mark along the entire distance you will be cutting the wood. If using a hand saw to cut the wood, it might help (for making a smooth straight cut) to use a utility knife to score (cut partially) about three times along the top of the wood where you will be cutting the wood. That will help keep the saw right where you want it as you cut the wood.
Wrap the boards with extra wide (2.8" wide) black duct tape (for appearance if you would like; alternately paint them). Instructions for this are below.
Lay out extra wide duct tape long enough to overlap each end of the board.

Put the wood board on the tape.

Cut the tape, on both sides, where indicated by the lines in the picture below.

Fold the tape over the top and bottom of the wood board.

Cut the tape where indicated by the lines in the picture below.


Fold the tape over the sides of the board.

Wrap six mending plates with black duct tape (for appearance; also adds padding for avoiding scratches). Instructions for this are below.
Put a piece of duct tape on the side of the mending plate that has the recessed holes for the screw heads. Trim the tape so when fold the sides over it won't go past the opposide edge of the mending plate.

Cut the tape where indicated by the lines in the picture below.
Fold the tape over the end of the mending brace.
Cut the tape as cut in the picture below.
Fold the tape over the sides of the mending brace. On the end you didn't fold the tape over the end of the mending brace, trim the tape if needed so the tape goes about 5 mm past the end of the mending brace.
On the end of the mending brace where you folded the duct tape over the end of the mending brace, use a Phillips screwdriver to break a hole in the duct tape where it covers the screw hole, twisting the screwdriver on both sides while the head of the screwdriver is in the hole.

Attach mending plates.
If a mending plate used to hold the board on the picture frame won't interfere with placing the hook where it needs to be (such as if the hook will be placed substantially below the top of the picture frame), you only need one mending plate at the top, otherwise you need two, one on each side of the hook as in the instructions below. Following these instructions will make it easy to change what is in the picture frame.
Tape a strip of paper (about 4 inches (10 cm) long) at the frame edge above and below where you want the hooks. This is for making marks on (so use two pieces of tape, one at each end of the paper, rather than covering the paper with tape).


On one side of the top of the picture frame, mark a line on the the paper (calling this "Paper 1") above where you want the hook.

Hold the hook on the paper so that the center of a screw hole is over the mark you just made and hold a mending plate to the left of it as in the picture below.

Draw a circle on the inside of the screw hole of the mending plate. Then remove the hook and mending plate.

Draw a line under the circle about a mm to the left of the center of the circle.

On a piece of paper (calling this "Paper 2") mark the distance between the two lines you made.

Use "Paper 2" to mark a line on "Paper 1" the same distance to the right of the first line.


Place another piece of paper (calling this "Paper 3") along the edge of the picture frame and mark the location of the three lines.

Use "Paper 3" to mark the two outside lines on the other top side of the picture frame. Also use "Paper 3" to mark the distance of the center line on the two strips of paper at the bottom of the picture frame.


Screw in a mending plate below each line at the top (other than the center line on the right side), and above each line at the bottom, such that the screw is directly below/above the line AND such that, with the mending plate positioned horizontally, no part of the mending plate is below the edge of the frame (about a mm from it is suggested) so you will be able to easily change what is in the picture frame. When putting the screws in, initially stop before the screw gets even a little tight. Once all screws are in, but not even a little tight, remove the pieces of paper you marked lines on. Then tighten the screws to just loose enough so that you can easily rotate the mending plate for switching out what is in the picture frame. (Note: At the top where using two screws near each other, optionally drill a small hole where you will be putting the second screw. If you do, make sure you don't drill through to the front of the picture frame. If you don't first drill a small hole where you will be putting the second screw it is possible the wood of the frame will split very slightly between the two screws (on the back of the frame) when putting in the screw for this second mending plate (for which you could use an ultra thin black marker to cover any visible blemish)).


Put a piece of duct tape over each screw head to avoid scratches.

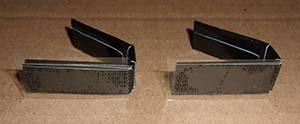
Attach hooks to the boards.
Put the backing material (preferably foam board) in the picture frame. Then put the wood boards in and rotate the mending plates over the boards. Make sure the top of each wood board is up against the top of the picture frame and any gap (in case your board is a little short) is at the bottom of the board.

Use items of identical height (big erasures, pieces of wood, packs of index/note cards, etc.) along with some type of cards (index/note cards, playing cards, cards from a game, etc.) to set the TV cover on for determining where to position the hooks. Add/remove cards (with the same number of cards on both sides) till the TV cover is positioned as you would like, making sure the bottom of the TV cover covers any descending piece on the front of the TV. (If needed, it will be possible later to raise the TV cover a little on one or both sides by putting layers of duct tape under the hook where the hook contacts the TV.) Then remove the picture frame, leaving the supports in place.

Place household double sided tape (or rolled tape) on the base of the hooks without covering the bottom hole.
With the hook positioned on the TV and the bottom of the picture frame on the supports, move the picture frame to the hook and, pressing with the hooking part of the hook, press the base of the hook to the vertical wood board to attach the hook to the wood board in the correct position.
Do this on both sides.
Remove the TV cover from the TV.
Remove the boards and use a pen to draw a circle inside the hole you will be putting a screw in (the bottom hole). Remove the hook and double sided tape. With the hook removed, start the 1/4" long screw (poke the tape) just enough to mark the location of the screw, adjusting right or left from the center of the circle if needed to position it at the center of the board. Remove the screw.
Attach the hook with the screw. Do this on both sides.

Attach the boards to the picture frame.
Collapse Step 12
Scroll to top of Step 12
If your foam board (or wall panel piece, etc.) might not be cut completely smooth and straight you might want to make the edge of the foam board that you didn’t cut the top edge.
If you plan to use 1/4" flat head screws to help hold the hooks to a 3/16" thick foam board, apply three layers of heavy duty duct tape to the back of each hook so the screws don't poke through the front of the foam board. If using 1/4" flat head screws to help hold the hooks to a wall panel piece you might need to apply five layers of heavy duty duct tape to the back of each hook, depending on the thickness of the wall panel. (Using screws is suggested to help keep the hooks from sliding up after you tape them in place. There are other options for helping to keep the hooks from sliding up like puting a dab of glue in the screw holes and/or where the top of each hook contacts the foam board (or other surface). Using only heavy duty duct tape will likely work for a while, but the hooks might eventually slide up.)
Use items of identical height (big erasures, pieces of wood, packs of index/note cards, etc.) along with some type of cards (index/note cards, playing cards, cards from a game, etc.) to set the TV cover on for determining where to position the hooks. Add/remove cards (probably with the same number of cards on both sides, unless the foam board wasn't cut completely level) till the TV cover is positioned as you would like, making sure the bottom of the TV cover covers any descending piece on the front of the TV. (If needed, it will be possible later to raise the TV cover a little on one or both sides by putting layers of duct tape under the hook where the hook contacts the TV.)

Remove the foam board, leaving the supports in place.
Place household double sided tape (or rolled tape) on the base of the hooks.
Attach the first hook: With the hook positioned on the TV and the bottom edge of the foam board on the supports, move the foam board to the hook and, pressing with the hooking part of the hook, press the base of the hook to the foam board to attach the hook to the foam board in the correct position.
Remove the foam board.
Mark above where you want the second hook to position the second hook about the same distance from the side as the first hook.

Attach the second hook using the same method as used for the first hook.
Remove the TV cover. Press the hooks to the foam board so they are attached more firmly. Optionally, test the TV cover on the TV without the supports.
If satisfied with the location of the hooks, put a 1/4" screw in the bottom screw hole of each hook to help keep the hooks from sliding up. Alternately, if not using screws (or in addition to using screws), to help keep the hooks from sliding up, put a dab of glue where the top of each hook contacts the foam board.
Use heavy duty duct tape to hold the hooks in place and to avoid scratching the TV.


Collapse Step 12
Scroll to top of Step 12
Step 13: If using a shoelace/bootlace (or something similar) to hold the TV cover to the TV, attach shoelace/bootlace
Step 13: If using a shoelace/bootlace (or something similar) to hold the TV cover to the TV, attach shoelace/bootlace
Canvas covered frame and picture frame
Canvas covered frame and picture frame instructions below
No frame (such as frameless foam board or wall panel piece)
No frame (such as frameless foam board or wall panel piece) instructions below
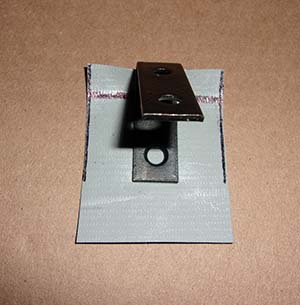
Initially use one narrow piece of duct tape to determine where to position the shoelace/bootlace.


(Pictures below are from attaching a shoelace/bootlace to a canvas covered frame.)
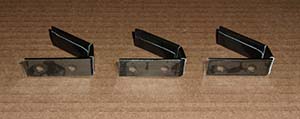
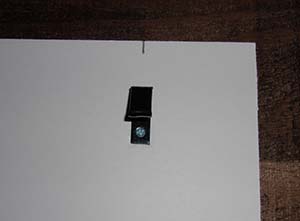
After determining the position for the shoelace/bootlace, put in staple nails, eyescrews, or other option listed in the supplies section for attaching the shoelace. If using staple nails, leave enough of the nail not pounded in so that you can easily adjust the shoelace.

Tie the shoelace/bootlace in place. If you want the TV cover to slant forward at the bottom and rest on the cart, make the shoelace looser. If you want the entire TV cover to be up against the TV, make the shoelace tighter.

If using eyescrews, after attaching the shoelace, cover the eyescrews with black tape.
Collapse Step 13
Scroll to top of Step 13
Cut a shoelace/bootlace to about 20 cm longer than the foam board
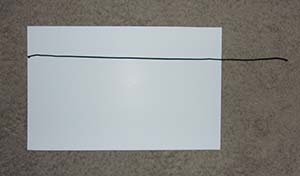
Initially use one narrow piece of duct tape to determine where to position the shoelace/bootlace and how tight to make the shoelace/bootlace. Have at least about 2 cm of bootlace on the outside of the tape (to the left of the tape in the picture immediately below)..


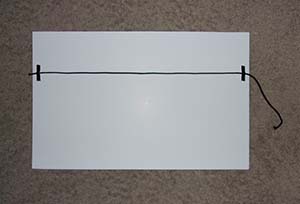
Fold the part of the shoelace that is to the left of the tape over the tape and tape it down to more securely hold the shoelace in place.
Use several pieces of heavy duty duct tape (ripped/cut into narrow pieces) to make a crisscross pattern to securely hold the shoelace in place.
Do the same on the other side.

Collapse Step 13
Scroll to top of Step 13
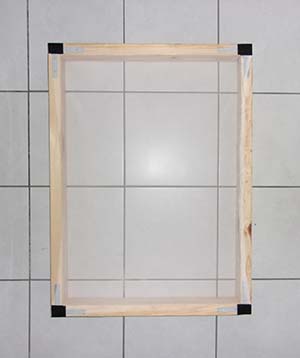
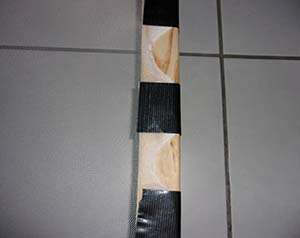
Step 14: If using wood sides, attach tape to sides of TV cover
Step 14: If using wood sides, attach tape to sides of TV cover
Note regarding the pictures for this step: For non-fabric coverings, completing steps 8 and 9 after step 7 is suggested (and also works for fabric coverings). For fabric coverings, completing steps 7 and 8 after applying the fabric covering (Step 15) is suggested. The pictures below are for a fabric covering with steps 8 and 9 being completed after Step 15, which is why in the pictures for this step, steps 8 and 9 haven't been completed yet.
This step will create a consistent underlying color for the sides (if you use the same color of duct tape as the color of the foam board) so any covering you put over the foam board that isn’t completely opaque has a consistent appearance on the front and sides of the TV cover. It will also smooth any areas where the wood pieces don’t line up completely flush (even) with the foam board or with each other.
Place the TV cover face down on a hard surface such as a table top or non-carpeted floor. Extend duct tape a little longer than a side edge of the TV cover. Place the duct tape on the side edge of the TV cover so that the edge of the tape goes past the edge of the wood board onto the foam board a little, but not past the front edge of the TV cover. It will probably be necessary to move the duct tape a little off the top of the table (or other work surface) as you attach the duct tape to the wood board. After completing one side, check to be sure the duct tape doesn’t go past the front edge of the foam board. Reposition if needed. (The thickness of the duct tape could be noticeable through your covering if duct tape is on the front of the TV cover.) Extend the duct tape further and continue on the top side of the TV cover, continuing until all sides of the TV cover with wood boards attached have duct tape on them.
Press the duct tape firmly onto the side of the wood boards. Rip/cut off the extra tape that extends above the boards. (If instead of ripping/cutting the extra tape off you put the tape down over the other sides of the wood pieces, if you use glue to hold the fabric onto the wood pieces, the fabric won’t stick as well to the duct tape as to the wood.)

Collapse Step 14
Scroll to top of Step 14
Step 15: Attach surface material covering to foam board (or other backing material)
Step 15: Attach surface material covering to foam board (or other backing material)
Instructions for some options are below
Fabric - If not using wood sides
Fabric - If not using wood sides - instructions below
Fabric - If using wood sides
Fabric - If using wood sides - instructions below
Self-adhesive shelf liner
Self-adhesive shelf liner instructions below
Laminate sheet (countertop type)
Laminate sheet (countertop type) instructions below
Gift wrap, decorative posterboard, etc.
Gift wrap, decorative posterboard, etc. instructions below
The pictures below are for covering a foam board to be placed in a picture frame. If covering a foam board (or oher backing material) that has hooks or a shoelace/bootlace, the steps are the same. When needed, cut slits in the fabric for the hooks or bootlace.
14a: Position the fabric on the front of the TV cover so that any design is positioned approximately as you would like and some fabric (preferably at least 10 cm) can be wrapped around to the back. Holding the fabric in place on the foam board, turn the foam board/fabric over and spread out the fabric. (The image below is with all of the above completed.)

14b: Mark and cut the fabric so that at least about 10 cm of fabric on the top and bottom sides will wrap around the back of the foam board, while when wrapped around the back there will be at least about 10 cm of space between the top fabric and the bottom fabric.

14c: With any design positioned as you would like (considering that you will be stretching the fabric a little both vertically and horizontally) duct tape the bottom edge of the fabric in place in a few spots starting at the center and including near the ends of the foam board. Don’t stretch the fabric in any direction as you apply the tape. You can stretch the fabric that is over the front of the TV cover in both directions later.

14d: Pull the fabric over the top of the foam board – somewhat tight both vertically and horizontally to reduce any wrinkles/creases. Check to make sure the fabric is positioned as you would like. If not, adjust where you taped the fabric in Step 14c.
14e: Duct tape along the entire length of the foam board where you taped the fabric in place in a few spots in Step 14c (taping over where you spot taped it).

14f: With the bottom edge of the foam board against a wall and the back of the foam board facing up, put a short piece of duct tape on the fabric near the center of the fabric with part of the duct tape off the fabric for taping the fabric to the foam board. Pull the fabric tightly over the top of the foam board to reduce wrinkles/creases and tape the fabric down. Next spot tape the fabric near the ends of the foam board. (Don’t stretch the fabric sideways as you apply the tape. You can stretch the fabric that is over the front of the TV cover sideways later.) Check the front to make sure the fabric is positioned as you would like and make any adjustments as needed. Continue spot taping the fabric to the foam board at about half way between the neighboring places where you spot taped it.


14g: After checking to make sure any design is positioned as you would like, duct tape the top edge of the fabric in place along the entire length of the foam board, taping over where you spot taped it.

14h: On one side, at the top, fold fabric at an angle and tape it in place. Fold the bottom side at a similar angle.

14i: With the fabric pulled somewhat tight over the back of the foam board to reduce wrinkles/creases, duct tape the side edge of the fabric in a few spots (including at the ends) to the back of the foam board.
14j: After checking to make sure any design is positioned as you would like, duct tape the side edge of the fabric in place along the entire length of the side edge of the fabric.
14k: Repeat steps 14h through 14j for the other side.

Collapse Step 15
Scroll to top of Step 15
Temporarily position the fabric with heavy duty duct tape
14a: Position the fabric on the front of the TV cover so that any design is positioned approximately as you would like and some fabric (preferably at least 10 cm) can be wrapped around to the back. Holding the fabric in place on the foam board, turn the foam board/fabric over and spread out the fabric. (The image below is with all of the above completed.)

14b: Mark and cut the fabric so that at least about 10 cm of fabric on the top and bottom sides will wrap around the back of the foam board, while when wrapped around the back there will be at least about 10 cm of space between the top fabric and the bottom fabric.

14c: With any design positioned as you would like (considering that you will be stretching the fabric a little both vertically and horizontally) duct tape the bottom edge of the fabric in place in a few spots starting at the center and including near the ends of the foam board. Don’t stretch the fabric in any direction as you apply the tape. You can stretch the fabric that is over the front of the TV cover in both directions later.

14d: Pull the fabric over the top of the foam board – somewhat tight both vertically and horizontally to reduce any wrinkles/creases. Check to make sure the fabric is positioned as you would like. If not, adjust where you taped the fabric in Step 4c.
14e: Duct tape along the entire length of the foam board where you taped the fabric in place in a few spots in Step 4c (taping over where you spot taped it).

14f: With the bottom edge of TV cover against a wall and the back of the TV cover facing up, put a short piece of duct tape on the fabric near the center of the fabric with part of the duct tape off the fabric for taping the fabric to the foam board. Pull the fabric tightly over the top of the foam board to reduce wrinkles/creases and tape the fabric down. Next spot tape the fabric near the ends of the foam board. (Don’t stretch the fabric sideways as you apply the tape. You can stretch the fabric that is over the front of the TV cover sideways later.) Check the front to make sure the fabric is positioned as you would like and make any adjustments as needed. Continue spot taping the fabric to the foam board at about half way between the neighboring places where you spot taped it.


14g: After checking to make sure any design is positioned as you would like, duct tape the top edge of the fabric in place along the entire length of the foam board, taping over where you spot taped it.

14h: On one side, at the top, fold fabric at an angle and tape it in place. Fold the bottom side at a similar angle.

14i: With the fabric pulled somewhat tight over the back of the foam board to reduce wrinkles/creases, duct tape the side edge of the fabric in a few spots (including at the ends) to the back of the foam board.

14j: After checking to make sure any design is positioned as you would like, duct tape the side edge of the fabric in place along the entire length of the side edge of the fabric.

14k: Repeat steps 14h through 14j for the other side.

14l: Tighten/adjust the fabric as needed at the corners so the fabric lays flat at the corners.
 Use glue (or an upholstery stapler) to permanently hold the fabric in place
14m: So the fabric stays in place after you later remove most of the tape, rub glue (regular household clear drying white multi-purpose glue) into and through the fabric on the sides of the wood pieces opposite the foam board. Do this along the entire length of the wood pieces.

14n: If needed (it might not be), glue any extra fabric that is at the bottom of the wood piece up to the wood piece.

14o: Let dry for at least four hours.
Remove most of the duct tape
14p: Remove the duct tape except for the tape holding the bottom edge of the fabric in place. (The tape you placed in steps 14c-14e.)
 Remove excess fabric on the back of the TV cover
14q: Use a utility knife, pocket knife, sharp kitchen knife, or scissors to remove the extra fabric on the back. When cutting, pull the fabric away where the blade is cutting the fabric.
 Complete steps 8 and 9 if you haven't already done so.

Collapse Step 15
Scroll to top of Step 15
Cut a piece of the self adhesive shelf liner to fit over the front of TV cover and around the sides to the back.
A suggested method:
Reverse roll the self-adhesive shelf liner so it doesn't curl back up when it is unrolled.
Remove the backing and tape down the self-adhesive shelf liner so it is stretched somewhat tight.

Put something (erasures, blocks, etc.) on the self-adhesive shelf liner for placing the foam baord against when placing the foam board on the shelf liner. This makes it easier to correctly place the foam board.


Place the foam board on the self-adhesive shelf liner, putting the top of the foam board against the erasures. Press down on the foam board.

Remove the erasures.

Cut the shelf liner at the corners.

Cut a slit in the shelf liner for the bootlace.

Fold the shelf liner over the top and bottom of the foam board. Then over the sides of the foam board.

Turn over and lightly rub over the area of any air bubbles, gradually increasing pressure as needed while rubbing over the area of any air bubbles.

Collapse Step 15
Scroll to top of Step 15
(If using laminate sheet in a picture frame, you only need to cut a laminate piece to fit in the picture frame. There is no need to attach it to any backing material. You simply place foam board in behind the laminate sheet.)
If using wood pieces at the edges, cut laminate strips for the top edge and sides of the TV cover. If the strips are a little wide that's fine. To cut the laminate you could use a plastic cutter or utility knife. (See the supplies section.) If using a plastic cutter or utility knife, using the cutting method described in Step 3 for cutting foam board is suggested. It might take about ten runs with the utility knife to cut the laminate. You could also score it a few times with the utility knife and snap the laminate at the score. Using a scissors is another option. If using a scissors it might work best to first cut the laminate about a cm from where you want the cut and then cut it where you want the cut. If using wood sides, apply household multi-purpose white glue to the laminate stips you cut for the sides.

Clamp laminate strips to TV cover. You might want to make the side of the laminate that you cut be towards the back of the TV cover.

Another clamping option is to use paper binding clips and angle aluminum or mending plates.


For cutting the laminate piece for the front of the TV cover, make lines to cut along by placing the TV cover on the laminate sheet and tracing. Cut the laminate piece for the front of the TV cover. (For cutting instructions see above for "If using wood pieces at the edges...".)
Apply household multi-purpose white glue only to the edges of the front of the foam board and apply the laminate sheet. (If you apply glue over the entire surface, as the glue dries the TV cover will become substantially warped.) Turn over and place weights, making sure the laminate piece is positioned correctly.


Collapse Step 15
Scroll to top of Step 15
Place the gift wrap, posterboard, etc. (referred to as "gift wrap" for the rest of these instructions) front down on a surface. If using gift wrap (or something else that curles at the ends) weight (or tape) down the edges.
Place a wood board, box, etc. on the gift wrap along where you want the top of the TV cover to be, such as placing the board, etc. paralell to the top of the the gift wrap. (Temporarily tape the wood board, etc. in place if it could slip out of place with a small amount of pressure, such as if the board, etc. you are using is very light.)

If using adhesive backed foam board, remove the sheet covering the adhesive.
Place the adhesive side of the foam board on the gift wrap, placing the top edge of the foam board along the wood board.
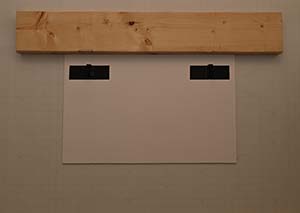
Remove the wood board.
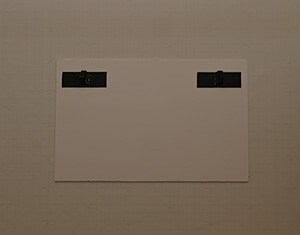
Fold the top and bottom of the gift wrap over the foam board and tape in place, cutting the gift wrap for the hooks or shoelace/bootlace as needed.
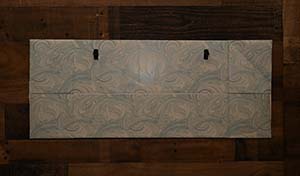
Fold the corners at an angle and tape in place.
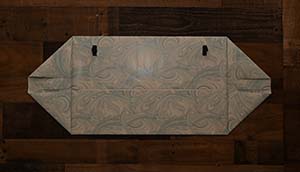
Fold the sides of the gift wrap over the foam board and tape in place.

If there are any air bubbles on the front (if you used self-adhesive backed foam board) smooth them down.

Collapse Step 15
Scroll to top of Step 15
Step 16: Attach edging if you would like edging (suggested if using a wall panel piece and if using a foam board without covering it)
Step 16: Attach edging if you would like edging (suggested if using a wall panel piece and if using a foam board without covering it)
Wall panel TV cover without any edge covering

Apply duct tape to the edge of the wall panel with an edge of the duct tape at the front edge of the wall panel. Use a utility knife (or sharp kitchen knife, etc.) to cut off the extra tape. Not being in a hurry when applying the tape or when cutting the tape will likely yield better results. When cutting the tape, gently pull the extra tape out as you move the utility knife along the back of the wall panel to remove the extra tape.
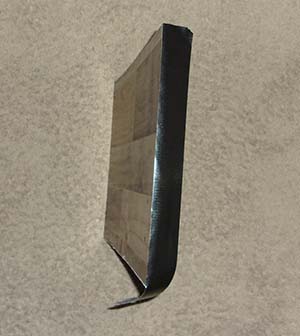
Wall panel TV cover with black duct tape used to cover the edges

Another option is to use a large chisel tip permanent black marker to color the edges black, being careful not to make stray marks. If you make a stray mark, use a dry paper towel or napkin to lighten the mark. After marking an edge, rub a dry paper towel or napkin along the front edge to remove/lighten a possible hint of marker at the very edge of the front of the panel.

If you want a border on the front of the TV cover, you could use colored tape, bulletin board trimmer, etc.
Collapse Step 16
Scroll to top of Step 16
Step 17: For TV covers with wood pieces on the sides and top, attach eye screws to the TV cover so the TV cover is more securely on the TV when it is over the TV
Step 17: For TV covers with wood pieces on the sides and top, attach eye screws to the TV cover so the TV cover is more securely on the TV when it is over the TV
Put in an eye screw somewhat in from each end of the top board to hold the TV cover securely to the TV when the TV cover is over the TV.
Optionally, put colored tape around the heads of the eye screws.
Alternately, attach a flat piece of metal (mending plate) to the back of the top wood piece such that part of it goes below the edge of the wood piece, and optionally put colored tape around it (possibly before attaching it).
Collapse Step 17
Scroll to top of Step 17
Step 18: (Optional) For TV covers with wood pieces on the sides and top, optionally attach angle aluminum on the back of the TV cover at the bottom if you notice bowing at the bottom of the TV cover and want to eliminate it
Step 18: (Optional) For TV covers with wood pieces on the sides and top, optionally attach angle aluminum on the back of the TV cover at the bottom if you notice bowing at the bottom of the TV cover and want to eliminate it
Cut a piece of angle aluminum to fit at the bottom of the TV cover between the two wood pieces on the sides (it doesn’t need to fit tight; 2 mm shorter than that would be fine and is suggested to be sure it isn’t too long). The aluminum piece was wrapped in black duct tape in the pictures below.
Put a wood screw in near the bottom of the wood pieces for holding the aluminum piece tight against the foam board. (The aluminum piece will need to be tight against the foam board to eliminate the foam board bowing in towards the TV.) The screws themselves don’t need to hold it tight against the foam board so you don’t need to be precise in positioning them. After putting in the screws you can roll duct tape and squeeze it between the screw and the aluminum piece for holding the aluminum piece tight against the foam board.


Collapse Step 18
Scroll to top of Step 18
Step 19: If not using hooks or shoelace/bootlace to hold the TV cover to the TV, lean the TV cover against the TV or put something in front of the TV cover to hold it in place.
Step 19: If not using hooks or shoelace/bootlace to hold the TV cover to the TV, lean the TV cover against the TV or put something in front of the TV cover to hold it in place.
Lean what you are using for your TV cover against the TV.

If you want something to aid in being sure the TV cover won't slip down, some options for that are below.
Two small bumpers can be used to sure the TV cover doesn't slip down. After positioning the first bumper with the TV cover leaning against the TV, you might want to remove the TV cover and use a measuring device (or mark the distances on paper) to position the second bumper symetrical to the first bumper.

A marble threshold (available in the flooring section of home improvement stores) is used in the picture below to be sure the canvas covered frame TV cover doesn't slip down. (The surface your TV is on will need to be at least as long as the marble threshold. Three feet is a typical threshold length in the U.S.)

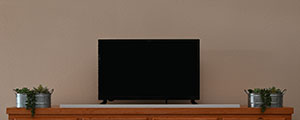
A rectangular flooring tile with a bumper attached to the bottom of the flooring tile near each corner of the tile is another option.


To hold the TV cover flat against the TV (instead of leaning against it) place an object in front of the TV cover.

Collapse Step 19
Scroll to top of Step 19
This is an affiliated site of Effects of TV.com


